LoRa Temperature Sensor Configuration Guide
1. App Setup & Device Connection
Use the Maya (Macnman) app to connect with the temperature sensor.
Steps:
- Install and login using Gmail
- Scan for nearby devices
- Connect via device list or QR code
Purpose:
Enables initial configuration and communication with the sensor.
2. Device Controls
After connection, the app allows to see & change :
- Device Name → Identify the sensor
- Heartbeat → Controls reporting interval
- Data Access → View live readings
Why it matters:
Helps manage device behavior and communication frequency.
3. Device Naming
- Open Name field
- Enter desired name
- Save

Best Practice:
Use structured naming (e.g., ColdStorage-Zone1).
4. LoRa Communication Settings
Go to LoRa Settings and verify parameters.
All settings must match: Sensor ↔ Gateway
Required Parameters
-
Class → Must match
-
Frequency (IN865) → Standard band in India
-
Spreading Factor (SF)
- Lower SF → Faster transmission, shorter range
- Higher SF → Slower transmission, longer range
-
Channel → Must be identical
-
Slave ID → Unique per device
-
Encryption Key → Must match for secure communication
Purpose:
Ensures stable and secure wireless communication.
How to change LoRa Class? :

LoRa Class
Select the appropriate LoRa Class based on your device’s power source and application needs:
-
Class A
Recommended for battery-powered devices. It offers the lowest power consumption and is suitable for sensors that transmit data occasionally. -
Class C
Designed for mains-powered devices. It keeps the receiver always on, allowing near-instant downlink communication from the server.
Choosing the correct class helps optimize battery life and network responsiveness based on your deployment.
Controller are available in the Class C mode only
LoRa Frequency

Select the appropriate LoRa frequency band based on your deployment region and local regulatory standards.
- Example
IN865(India),IN868(Europe),US915(North America)
LoRa SF
How to LoRa Spreading Factors ? :
Inside LoRa settings, navigate to SF (Spreading Factor) and toggle up and down as per requirement.

LoRa Channels
How to setup LoRa channels ? :
Inside LoRa settings, navigate to channels and type in channel number as per requirement.

Slave ID
How to setup device slave ID ? :
Inside LoRa settings, navigate to Slave ID and type in Slave ID number as per requirement.

Encryption Key
How to setup device Encryption Key ? :
Inside LoRa settings, navigate to Encryption Key and type in Encryption Key number as per requirement.

5. Network Capacity
- Supports up to 20 devices per gateway
- Recommended at 5-minute uplink interval
Note:
Reducing interval may affect scalability.
6. Viewing Sensor Data
Navigate to: Device Data
Available readings:
- Temperature
- Humidity
- Battery Status

As shown on page 4, if the sensor is not properly connected, readings may display as errors.
Purpose:
Provides real-time environmental monitoring.
7. Modbus Data Reading (Advanced)
For wired data access:
- Connect gateway to PC via RS485 converter
- Use the following parameters:
| Parameter | Value |
|---|---|
| Slave ID | 1 |
| Function Code | 4 |
| Address | 8 |
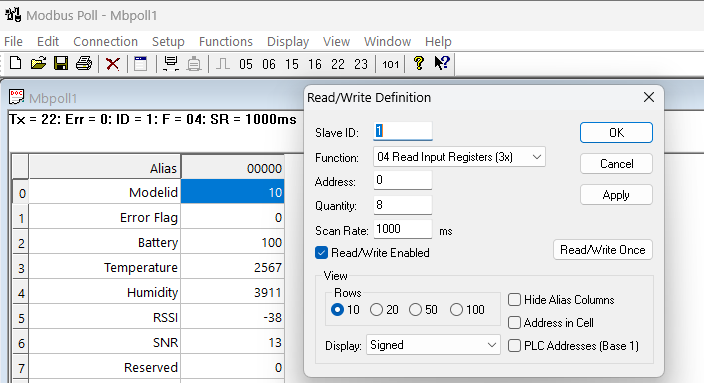
Purpose:
Allows integration with external monitoring or SCADA systems.